This is a factory fitted BMW electric Tow bar fitted on a BMW 5 series F10.
Friday, 6 March 2015
Wednesday, 4 March 2015
Converting a RHD classic Mini to LHD
For minis built before '89, all you need is a left hand drive steering rack FAM7307 (STEERING RACK LHD UNIT), move the wiper motor to the other side with the wiper water bottle, move the brake and clutch master cylinders to the Left, will need new brake lines from the brake master cylinder to the limiter valve BAU5655MS (BRAKE PIPE KIT LEFT HAND DRIVE CONVERSION FOR GMC227), and some clutch hydraulics.
The steering column and pedal box will just swap to the other side. you will also need a LHD throttle pedal (NAM3107 ACCELERATOR PEDAL LHD) and Acceleration cable.
Note: the existing throttle pedal can be bent into the right shape easily enough.
On later minis with the instruments behind the driver you just unbolt the Instruments and bolt them back on the other side. The wiring loom is designed to be the same for both sides.
The direct servo assisted brakes fitted from '89 onwards will need to be swapped for LHD specific parts, as the master cylinder stays on the right, and a shaft runs along the bulkhead to operate it.
Swap the wipers over (use the pre-drilled holes). Parts are the same, you just have to rebuild the rack housing and wheel boxes so they are mirrored and fit the motor on the other side. The wiring sometimes reaches the new motor location, if not you will need to extend the wires to reach the other side.
Sunday, 22 February 2015
iPhone 3GS 6.1.6 - 6.1.3 untethered jailbreak and unlock
1) Restore your device with iPhone2,1_6.1.6_10B500
2. Jailbreak Process:
2.1) Open redsn0w_win_0.9.15b3
2.2) Go to extra
2.3) Go to select ipsw
2.4) Select iPhone2,1_6.0_10A403_Restore
2.5) Back
2.6) Jailbreak
2.7) Uncheck install cydia
2.8) Check install iPad baseband
2.9) Next, follow the instructions to enter dfu mode
2.10) Wait until done and phone starts normally
2.11) Follow again steps 2.1-2.7
2.12) Check Downgrade from iPad baseband (make sure to UNcheck install cydia)
2.13) Next, follow the instructions to enter DFU mode
2.14) Follow again steps 2.1-2.6
2.15) Check install cydia
2.16) Next, follow the instructions to enter DFU mode
2.17) let the phone finish until it comes to the apple logo
3) There will be no cydia in your device
3.1) Open redsn0w_win_0.9.15b3
3.2) Go to extra
3.3) Go to select ipsw
3.4) Select iPhone2,1_6.0_10A403_Restore
3.5) Go To Just boot
3.6) Follow the instructions to enter DFU mode
4) after device boots you can see cydia
5) Open Cydia.
6) Click the "Changes" tab in the footer.
7) Press the "Refresh" button in the top left corner.
8) After "Reloading Data", perform a search for "p0sixspwn" (the O is a zero).
9) Tap Install.
10) After installing p0sixspwn your device is untethered
11) Install ultrasn0w 1.2.8 (Cydia and click Manage. Then select Source > Edit and choose Add this repo: http://repo666.ultrasn0w.com)
12) turn phone off and back on!
Enjoy!!!
Feedback:
DIY: BMW E46 Gauge rings installation
This is a DIY guide for installing the gauge rings on a BMW E46 model.
Requirements:
Before removing any screws or wire plugs remove the key from the ignition switch.
Step 1:
Remove the two T15 screws

Step 2:
Adjust your steering wheel as low as possible. Pull the cluster towards you but be careful from the wire plugs behind. (Sorry but I took the photo after installing the ring. It makes no difference!)


Step 4:
As soon as you disconnect the wires gently pull the cluster out from the dash.
Step 5:
On the back side of the cluster you will find five T10 screws. Remove all five! (Some clusters may have four screws)
Step 6:
After you have removed the five screws gently pull the grey cover upwards.

Step 7:
Gently pull the cluster from the wire plugs upwards.

and place it somewhere safe with the gauges facing upwards

Step 8:
Installing the big rings. It will not fit to pass on the other side where the glass is. So you will have to gently push the rings sideways, they will bend a bit and they will pass on the other side.

Step 9:
Installing the small rings. Pass them through the big rings.

Step 10:
Before placing everything back make sure that the buttons are placed like this (you might accidentally rotated them):

Step 11:
Do everything backwards from step 7 to step 1!
Step 12:
Final look!!!

Requirements:
- The Gauge rings
- T10 Screw Driver
- T15 Screw Driver
Before removing any screws or wire plugs remove the key from the ignition switch.
Step 1:
Remove the two T15 screws
Step 2:
Adjust your steering wheel as low as possible. Pull the cluster towards you but be careful from the wire plugs behind. (Sorry but I took the photo after installing the ring. It makes no difference!)
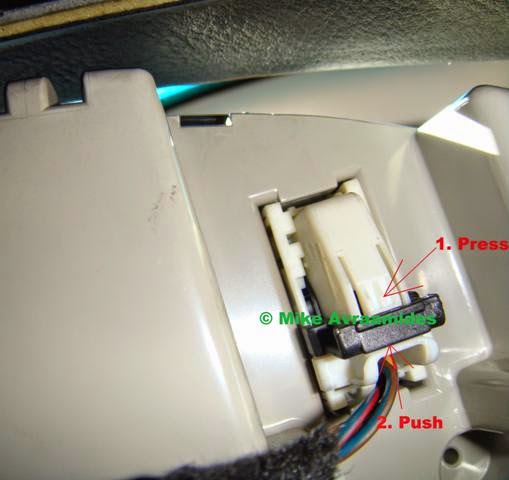
Step 3:
Disconnect the 2 wires behind it and make sure when plugging them back the black plug goes in the black port and the white plug goes in the white port! (The black plug is longer and it will NOT fit in the white plug, so there is no chance getting this wrong!)Step 4:
As soon as you disconnect the wires gently pull the cluster out from the dash.
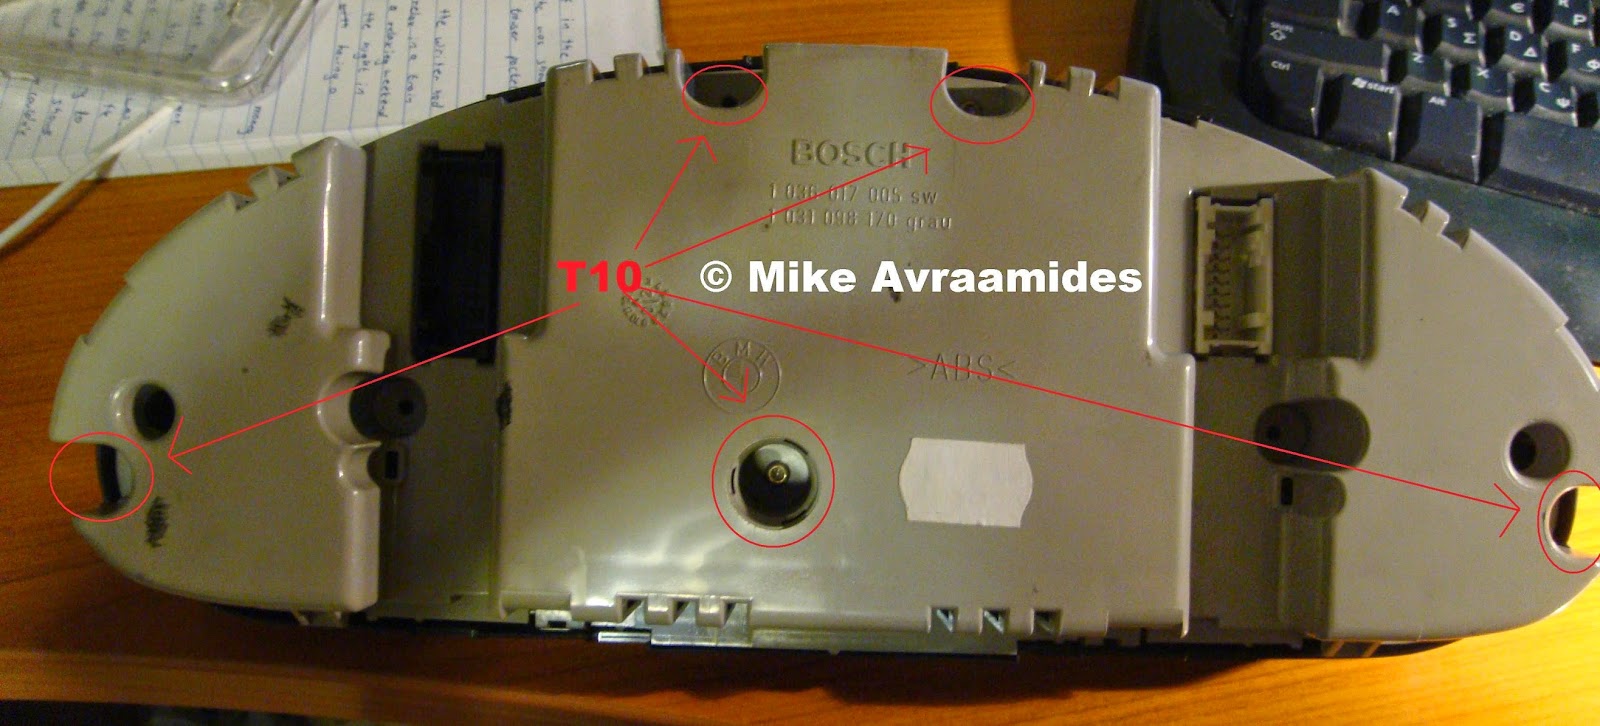
Step 5:
On the back side of the cluster you will find five T10 screws. Remove all five! (Some clusters may have four screws)
Step 6:
After you have removed the five screws gently pull the grey cover upwards.
Step 7:
Gently pull the cluster from the wire plugs upwards.
and place it somewhere safe with the gauges facing upwards
Step 8:
Installing the big rings. It will not fit to pass on the other side where the glass is. So you will have to gently push the rings sideways, they will bend a bit and they will pass on the other side.
Step 9:
Installing the small rings. Pass them through the big rings.
Step 10:
Before placing everything back make sure that the buttons are placed like this (you might accidentally rotated them):
Step 11:
Do everything backwards from step 7 to step 1!
Step 12:
Final look!!!
Subscribe to:
Comments (Atom)